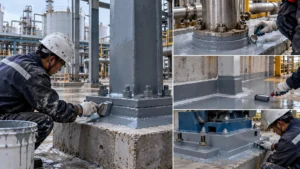
Epoxy coating application looks straightforward — mix two components, spray. In practice, a surprising number of coating failures trace back to application mistakes rather than product quality. Wrong mixing ratio, applied outside the temperature window, overcoat interval missed, surface prep not inspected before coating — any of these can undermine a product that would otherwise perform perfectly.
This is a practical guide for anyone specifying, supervising, or carrying out epoxy coating application on steel — covering surface preparation through inspection.
Before You Open the Cans: Pre-Application Checks
Application starts before any coating is mixed. A few checks that prevent problems later:
- Verify the product matches the specification — check the product name, colour, and batch number against the approved product list
- Check the shelf life — most two-component epoxies have a 12-month shelf life from manufacture. Using out-of-date material risks poor cure and adhesion
- Confirm application conditions — substrate temperature must be ≥ 3°C above the dew point, and within the product’s minimum and maximum application temperature range (typically 10–40°C, but check the TDS)
- Check surface preparation — don’t start applying until surface preparation has been inspected and signed off. Applying coating over inadequate surface prep is the single most common cause of premature failure
On that last point: the surface needs to be dry, free of dust, oil, and soluble salts, and within the application window after blasting (typically 4 hours, or before visible oxidation — whichever comes first). If it’s been more than 4 hours since blasting in a humid coastal environment and you can see flash rust forming, the surface needs to be re-blasted.
Surface Preparation: The Non-Negotiable Foundation
For high-performance epoxy systems — anything going into C4, C5, or CX service — the minimum surface preparation standard is ISO 8501-1 Sa 2½ (near-white blast cleaning). Sa 2 is not sufficient for zinc-rich primers or high-build epoxy. Sa 3 may be required for immersion service.
Three parameters to verify before coating:
- Cleanliness standard — visual comparison against ISO 8501-1 photographic reference standards
- Surface profile — measure Rz using Testex replica tape (ISO 8503-5); typical requirement for epoxy systems is Rz 40–85 µm
- Chloride contamination — Bresle patch test per ISO 8502-9; maximum 20 mg/m² for C4 and above
Don’t skip the chloride check, especially in coastal environments or on steel that has been in outdoor storage. Chloride contamination beneath an epoxy coating is the leading cause of osmotic blistering — and it’s completely invisible at application time.
For a full surface preparation reference, including ISO 8501 and SSPC standards, see the surface preparation guide for industrial coatings
Mixing: Getting It Right Every Time
Two-component epoxies fail to cure properly when the mixing ratio is wrong. The ratio — typically expressed as Part A : Part B by volume — is determined by the stoichiometry of the resin-hardener reaction. It’s not approximate. A ratio that’s 10% off in either direction affects cure quality; 20%+ off can result in soft, under-cured film.
- Stir Part B (hardener) thoroughly before use — hardener components can settle or stratify
- Add Part A to Part B (or B to A — per the manufacturer’s instruction), not the other way round
- Mix thoroughly with a mechanical mixer (power drill with paddle) for the time specified on the TDS — typically 2–3 minutes minimum
- Scrape the sides and bottom of the container during mixing — unmixed material at the edges is a common source of poor cure patches
- Wait the induction time if specified — some amine-cured systems need a defined period after mixing before application begins
- Mix only what you can apply within two-thirds of the stated pot life — not the full pot life
When using pre-measured containers (unit packs), still mix thoroughly — the components may have settled during storage. A common mistake is assuming that pre-measured means pre-mixed. It doesn’t.
For a full explanation of how pot life works and what happens when it’s exceeded — including how hot weather compresses the application window — see what is pot life in epoxy coating.
Application Methods: Spray, Brush, Roller
Airless Spray — Standard for Most Industrial Applications
Airless spray is the preferred application method for industrial epoxy coatings. It gives the most consistent DFT, fastest coverage, and best film quality for most products. Key settings:
- Pressure: typically 180–250 bar (check product TDS for specific recommendations)
- Tip size: typically 0.017–0.021 inches for standard solvent-free epoxy; larger tips for glass flake systems (0.023–0.027 inches) to maintain flake suspension
- Spray angle: 65–80° fan width for broad surfaces; narrower for tight areas
- Gun distance: typically 30–50cm from the surface; too close causes runs, too far causes excessive overspray and dry spray
Maintain a consistent speed and overlap (50% fan overlap on each pass). Inconsistent speed is the main cause of DFT variation in spray application.
Brush and Roller
Used for stripe coats on edges and welds, touch-up of small areas, and projects where spray application is not practical. For most high-build epoxy systems, brush and roller application gives lower DFT per coat and less uniform film — expect to apply more coats to achieve the same total DFT as spray.
Stripe coating — a preliminary brush coat applied specifically to edges, welds, bolt heads, and other geometrically complex areas — is specified before the main spray coat in most industrial coating specifications. It ensures adequate film build where spray application leaves thin spots.
Application Conditions: What Stops You Spraying
| Condition | Limit | Why It Matters |
| Substrate temperature | ≥ 3°C above dew point | Moisture condensation under the film — adhesion failure |
| Minimum application temp. | Typically 10°C (check TDS) | Slow or incomplete cure below minimum temperature |
| Maximum application temp. | Typically 40°C substrate (check TDS) | Pot life collapses; dry spray risk |
| Relative humidity | Usually ≤ 85% for epoxy; amine-cured sensitive to humidity | Amine blushing; moisture in film |
| Wind speed | < 5 m/s typically for spray application | Overspray, dry spray, contamination |
| Rain / dew | No application during rain or when rain is forecast within 4 hours of cure time | Water in uncured film |
In hot weather — Middle East summers, for example — the limiting factor is often pot life rather than temperature itself. Substrate temperatures of 50–60°C in direct sun are not unusual. This means you’re either working in shade/tented areas, working early morning before solar heating peaks, or using a slow-cure hardener.
Inter-Coat Interval: Minimum and Maximum
Each coat of epoxy has a minimum overcoat interval (allow adequate cure before applying next coat) and a maximum overcoat interval (don’t let too much time pass or inter-coat adhesion degrades).
The minimum is straightforward — check the TDS at the application temperature. The maximum is the one that gets ignored. Most epoxy systems have a maximum overcoat window of 24–48 hours under normal conditions. In hot weather, this window can close faster. After the maximum, the surface needs to be lightly abraded to re-open the surface before the next coat — skipping this step is a documented cause of inter-coat delamination.
Inspection Hold Points
For any structured quality plan, coating application has defined hold points where inspection is required before proceeding:
- H1 — after surface preparation: cleanliness, profile, chloride check — before any coating is applied
- H2 — after primer: DFT per SSPC-PA 2 or ISO 19840; visual for holidays, runs, sags
- H3 — after intermediate coat(s): DFT check; visual; confirm overcoat interval was respected
- H4 — after topcoat: final DFT check; visual; adhesion test if specified; holiday test if required
On smaller projects these hold points are often informal. On larger industrial or offshore projects they’re contractual — work cannot proceed past a hold point until the inspection record is signed off.
For a complete hold-point checklist covering surface prep, DFT, recoat intervals, and touch-up procedures, see the steel structure coating inspection checklist.
For a step-by-step walkthrough of how to measure DFT correctly in the field — calibration, SSPC-PA 2 protocol, and where to focus inspection — see how to measure dry film thickness.
Common Problems and What Causes Them
Runs and sags: too much material applied in one pass, or gun held too close. Solution: reduce tip size, increase distance, reduce pass speed.
Dry spray (rough, sandy surface texture): gun too far from surface, excessive air movement, or coating applied in very high heat. Solution: reduce distance, work in sheltered conditions.
Pinholes and craters in the cured film: solvent entrapment (from thinning or fast-evaporating solvent), surface contamination (oil, silicone), or applying too thick per coat. Solution: check thinning practice; check surface for contamination.
Poor adhesion to previous coat: maximum overcoat interval exceeded; surface contaminated between coats; incompatible primer. Solution: abrade and re-coat; check overcoat window was respected.
For a deeper look at how epoxy compares to polyurethane — including which system suits structural steel, tanks, or marine applications — see epoxy vs polyurethane coating: how to choose.
Send your project environment, steel schedule, and coating specification via the project inquiry form and our technical team will advise on product selection, application conditions, and DFT requirements for your project.